Types of Window Coverings
/
My Grandma Esther is my inspiration for contentment and frugal living. She was born in 1921 and started out her life during the Depression. Her family didn't have much and they lived in the country. It was a hard life but they somehow managed.

I sometimes wonder if this is why she was always so frugal or maybe it was just her nature. She got married during WWII to Grandpa Sonny (Aaron).

They bought 30+ acres in upstate New York, where my family had lived for generations.
My grandparents had 3 children- Karen (my mom), Aaron and Jo Anne.

I always felt that they must have been the luckiest children in the world, to grow up with the forest to run around, swim in the pond, and have a wonderful childhood. They learned a lot about responsibility, helping my grandparents with gardening and taking care of the property. My grandpa worked in construction, while my grandma stayed at home, raising the kids and taking care of the home.
By the 70's and 80's, my grandparents had 4 new grandchildren, myself, cousins Lisa and Mark and my sister Emily. They were definitely doting grandparents and always treated us like their children.

I spent a lot of time there and learned a lot about responsibility. Here are some of the ways my grandma inspired me.
Grandma loved to bake and cook and did things out of not only necessity, but out of love. Because they lived in the country, she was used to making three square meals a day. They did go to the grocery store for necessities they couldn’t grow or hunt themselves.
She learned from her mom how to survive in the country, especially during the bitter cold upstate New York winters. Grandpa and Grandma, up until their 80s, kept gardens, growing corn, giant pumpkins, peas, raspberries, carrots, potatoes and more. They were always canning and freezing food for the fall and winter. I remember helping her shuck corn and peas for canning. It was tedious work, but looking back now, I am so happy I had that experience to help her.
My grandmother was an expert seamstress, which was how she paid for her college tuition in the 1940s. She made clothes for her children and grandchildren, knitted blankets, pieced together patchwork quilts, decorated her home and cooked meals every day for years. She found knitting and crocheting not only practical, but relaxing.
I remember going to the library with Grandma Esther and picking out a few books. She loved to read and was always reserving the next great book on her list. She also loved reading the New Yorker magazine, and when I got a subscription for her, she was thrilled. She also enjoyed taking walks outside, visiting family and friends, and listening to music. She rarely watched TV as they didn’t have cable. Though I do remember watching Wheel of Fortune and Dukes of Hazzard with her as a child! Those were the good old days!
My grandmother’s generation didn’t believe in debt, and therefore, she never got into debt or even had her own credit card. For whatever she needed, she paid cash. She saved her change and dollar bills and only bought things when she had the money. She saved up for what was important to her. She also used coupons when she went shopping, which wasn’t very often.
More ideas from Grandma that I have implemented into my life:
1. Use cloth instead of paper. My grandma had a bucket of clean rags, that she used to wipe down everything. She rarely used paper towels. Microfiber cloths are also a great option, washable, durable and reusable.
2. Buy and use green cleaning products, or make them yourself! Just search on Pinterest for eco-friendly green cleaner recipes. Plus, shop for eco-friendly beauty products, eco-friendly fashion lines and eco-friendly home decor. I really like Green Works and Method.
3. Laundry. Wash laundry in cold water instead of hot. Line-dry when you can. There is nothing like line-dried clothing, that has dried in the sun! You will never forget that clean air smell.
4. Conserve Energy - Turn off the lights when you leave the room, or open the curtains and blinds and rely on the sunlight to cut down on electricity use. Only run the dishwasher when you have a full load. Shut down and turn off your computer completely at night.
5. Change your light bulbs. Switch a few of your light bulbs to CFLs , which use about 75 percent less energy and last seven to 10 times longer than regular incandescent bulbs, until eventually you have all of your house switched over. This was a hard one for me because I love my old-school bulbs. Now that they are phased out of most stores, I have had to bite the bullet and buy the new bulbs. Six years ago, my 90 year old grandfather, was light years ahead of me because he used CFLs and preferred them!
6. Repurpose glass jars as leftover containers, bulk storage or even pretty vases. I love mason jars for this.
7. Buy used and donate. Shop thrift stores and craigslist for clothing, home items and more. Grandma was a thrift shopper, she loved a good deal. She also loved to knit, sew and crochet. While I'm not much of a thrift shopper, I donate a lot to Goodwill.
8. Stop using disposable bags. Purchase reusable bags. They are more durable and don't clog up land-fills! I love, love, love my Target reusable bag. I keep one in my car and one in the kitchen.
9. Quilting/reusing material/reusing old clothes and sheets for material. Grandma was an expert seamstress and could make all kinds of clothing, Halloween costumes and more.
10. Gardening. Grandma was known for her beautiful gardens. She grew not only flowers but rows of corn and raspberries, potatoes, green beans and much more.
11. Canning food. I remember every fall growing up, Grandma would can food. This was a long procedure, from picking the food, preparing it, and then canning it. It paid off- all winter, they had fresh, homegrown food on their table.
12. Baking your own bread-- Really, is there anything better than homemade bread? Grandma didn't think so either. Homemade bread, with a bit of homemade jelly or butter was always a special treat at Grandma's house.
One snowy night in November of 2003, my Grandma Esther passed away at age 83 in her bed. Grandpa passed away 4 years later, working outside on his tractor. Up until the end, they both had lived the life they wanted to, one of love, contentment, happiness and peace.


Build-a-rink kits can also be purchased in many stores, but if you've got snow, freezing temperatures, and access to a hose and water supply for flooding, these kits aren't necessary. Proper-fitting helmets, however, are essential, and in most cases, it's the law. Don't let your children step onto the ice without them
Keep yourself safe on the road with these 7 car prep tips!
Your vehicle's battery loses 33% of its power when the temperature dips below freezing and as much as 60% of its juice when the mercury falls below zero. So it's wise to give the battery and its charger a once-over to ensure they're performing optimally. A quick trip to your local car technician will quickly reveal whether the battery is winter-ready, or corroded and otherwise not performing well.
Windshield wipers are crucial to a clear view from the driver's seat — but a nasty winter storm makes their job many times harder. That's why you should consider investing in a pair of winter blades, which are built to withstand precipitation and freezing cold. Most winter blades are encased in a protective rubber shell that prevents ice and snow from hardening on the wiper. The going rate for a pair ranges from less than $20 to about $40, depending on size and quality.
While you're attending to windshield issues, car safety experts also suggest switching over to cold weather washer fluid, or any brand containing antifreeze.
You're driving down the road when your tires hit a patch of ice that sends you sliding into a snow bank. It's a gentle spinout that causes no injury or damage, but now your front tires are sunk in a heap of fresh snow. You're not going anywhere for awhile — unless you packed a shovel and have the muscle to dig yourself out. The shovel needn't be a humdinger, just something sturdy that fits in the trunk.
For every 10 degree change in temperature, car tires lose a pound of pressure. That's why it's wise to make sure the pressure in all four tires is in check at the outset of the winter season. In cold weather, any pressure imbalance will be made that much worse.
Car tires in any season need a tread depth of at least 6/32-inch to get adequate traction, according to Tire Rack. If yours fall short, you're going to need to go tire shopping. Wintry road conditions necessitate even more depth than normal to help the tire grooves compress and release snow as they roll. Without sufficient tread depth, spinouts are more likely.
Should you opt for new winter tires, be sure to get a full set. Mounting winter tires on the front of a front-wheel-drive car can prompt sliding while putting winter tires only on the back of a rear-drive car will make turns more difficult.
Cold weather thickens the engine oil, which forces the car battery to work double time to get your car running smoothly. But you can give your battery a break and prevent potential engine trouble by switching over to a thinner oil. Most vehicles are served well by a 5W-20, 5W-30, or 10W-30 oil formula, but be sure to check your owners manual for notes on compatibility. It's also wise to have the oil filter changed to maintain fluidity.
Should you get stranded on the side of a highway during a temper tantrum by Jack Frost, you'll be much less likely to run the risk of frostbite, hypothermia, or plain old cold weather discomfort if you've got a warm blanket stowed away in the trunk. While you're at it, it's not a bad idea to add a set of hand warmers, gloves, a wooly hat, a flashlight, bottled water, and a non-perishable snack to your winter weather emergency survival kit. Here's hoping you never have to use it.
Source: Wisebread.com


Trader Joe's fans, did you know these secrets?? My family loves the cookie butter (so addictive!), the ginger snaps, so many fun grocery items!

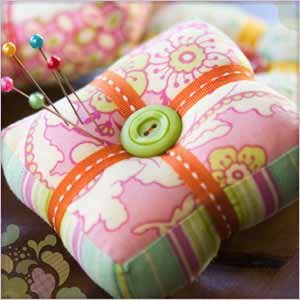
Using some fabric, poly stuffing and hot glue, your teacup can become a pretty little pincushion.
Instructions

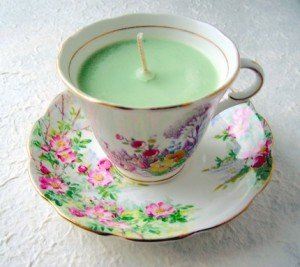
In a small pan set over a larger pan of simmering water, melt down old candles; clip the thermometer to the upper pot, and keep temperature at about 185 degrees. Remove old wicks with tongs.
Cut a piece of wicking to the cup's height plus 2 inches. Clamp one end to a wick sustainer; tie the other end around a skewer. Dip wicking and sustainer into melted wax to coat them. Remove and stick sustainer to cup's bottom.
Pour in the wax, stopping 1/2 inch below the cup's rim. Allow wax to set, about 1 hour. The candle will harden with a well in the center. To even it out, use another skewer to prick a circle of holes about 1/16 inch deep around the wick. Pour in melted wax until surface is 1/4 inch below rim. Cut wick.
